Getting Started with SQL Server Management Studio (SSMS)
Topics Covered
- Introduction to SQL Server Management Studio (SSMS)
- Installing SQL Server and SQL Server Management Studio (SSMS)
- Connecting to the SQL Server
- Creating Your First Database
- Basic Operations in SQL Server Management Studio
1. Introduction to SQL Server Management Studio (SSMS) SQL Server Management Studio (SSMS) is an integrated environment for managing any SQL infrastructure, from SQL Server to SQL Database, and is used for both database development and administration. With SSMS, you can connect to, query, and manage your SQL Server databases and objects.
Key Features of SSMS:
- Database Management: Create, modify, and delete databases.
- Query Execution: Write and execute SQL queries.
- Server Administration: Manage server-level settings, backups, security, etc.
- Reporting: Build and view reports based on your data.
2. Installing SQL Server and SQL Server Management Studio (SSMS)
Before you can get started, you need to install both SQL Server (the database engine) and SSMS (the management tool).
Installation Steps:
Download SQL Server
Go to the official Microsoft download page for SQL Server:
SQL Server DownloadsFor beginners, the SQL Server Express edition is free and sufficient to get started.
Download SQL Server Management Studio (SSMS)
You can download SSMS from here:
SSMS DownloadInstall SQL Server
After downloading the installer, run it and follow the installation steps. Choose the default options for a typical installation, or customize based on your requirements.Install SSMS
Once SQL Server is installed, you can install SSMS using the downloaded setup file. Follow the on-screen instructions to complete the installation.
3. Connecting to the SQL Server
Once SQL Server and SSMS are installed, you can connect to your SQL Server instance to begin managing databases.
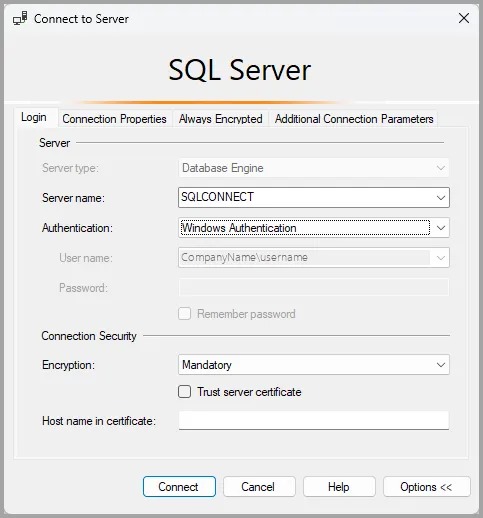
Open SSMS
Launch SQL Server Management Studio.Connect to Server
In the Connect to Server dialog:- Server Name: Type
localhostif the SQL Server is installed on your local machine, or enter the server name/IP address. - Authentication: Choose Windows Authentication if you're using your Windows login, or SQL Server Authentication if you have a SQL login set up.
- Username: Enter the username (for SQL Authentication).
- Password: Enter the password (for SQL Authentication).
- Server Name: Type
Connect
After entering the details, click the Connect button. If successful, you’ll see the Object Explorer on the left.
4. Creating Your First Database
Now let’s create your first database using SSMS.
Open a New Query Window
Once connected, click New Query in the toolbar to open a query editor.
Create a Database
Type the following SQL command to create a database namedTestDB:Execute the Command
Click the Execute button or press F5 to run the query. If successful, you’ll see a message that the command completed successfully.
View the Database
In the Object Explorer pane on the left, you should seeTestDBlisted under Databases. You can expand it to see tables, views, and other database objects.
5. Basic Operations in SQL Server Management Studio
Now that you have your database, let’s perform some basic operations:
Creating a Table
Let’s create a table in the
TestDBdatabase.Use the Database
Before creating a table, we need to make sure we’re using theTestDBdatabase. Type the following:USE TestDB;
Create a Table

Let’s create an
Employeestable with columnsEmployeeID,FirstName,LastName,Department, andSalary.Insert Data into the Table

To insert data into the
Employeestable, use the following query:Query the Table

To view the data you just inserted, run:You should see the data displayed in the Results pane below the query editor.
Practice Tasks
- Create another table in
TestDBfor storing information aboutDepartmentswith columns likeDepartmentID,DepartmentName. - Insert sample data into your
Departmentstable. - Perform a JOIN between the
EmployeesandDepartmentstables (if you create both tables) to link employees to their respective departments. - Write queries to filter employees based on their department or salary range.
Conclusion
By now, you should have:
- Installed SQL Server and SQL Server Management Studio (SSMS).
- Connected to your SQL Server instance.
- Created a database and a table.
- Inserted data and queried the table using SQL commands.
These are the foundational steps in working with SQL Server and SSMS. The more you practice, the more proficient you’ll become in managing and querying databases effectively.